SIRENIA
Flows
Table of Contents
This page documents the API for interacting with fields and the global objects in flows.
In general flows are JavaScript code and thus any valid JavaScript is allowed. See https://developer.mozilla.org/en-US/docs/Web/JavaScript/A_re-introduction_to_JavaScript for a JavaScript intro. The objects Inputs, Fields and all the rest of the modules listed below are made available for all flows s.t. they can be accessed in the JavaScript code.
We include the utility library lodash 4.7.10 in all flows. See https://lodash.com/docs the available functions.
There is also a tutorial to the Cuesta tool which also contains a few examples of flows. It is highly recommend that you go through the tutorial before diving into this reference documentation.
Inputs
Inputs to a flow can be accessed via the Inputs array. Inputs are generally strings.
Example
var mi = Inputs["myinput"];
Fields
Fields can be accessed via the Fields object. Each field has a number of methods - it may not always make sense to invoke a given method on a field.
Click
Will click on the given field.
Parameters
optionsan optional options object, supports;deadlinethe time in ms to wait for the click to fail/succeed. If the click takes longer than the deadline to fail or succeed it will be reported as succeeding to the caller. The use-case for thedeadlineparameter is for example if the click launches a dialog which blocks the thread, then setting a deadline allows the flow to continue even though the click is technically not done.useCachedUIboolean indicating if UI component lookup should use the UI itself or the underlying model. Defaults tofalse(underlying model traversal).
Example
Fields["mybutton"].click();

// With an optional 500 ms deadline
Fiels["mybutton"].click({ deadline: 500 });
Support
- ChromeDriver
- IEDriver
- JavaDriver
- NativeDriver
Click with offset
Will click on the given field offset by the amount given. It allows you to e.g. click in the middle of a table row or the corner of a button.
Parameters
optionsan optional options object, supports;deadlinethe time in ms to wait for the click to fail/succeed. If the click takes longer than the deadline to fail or succeed it will be reported as succeeding to the caller. The use-case for thedeadlineparameter is for example if the click launches a dialog which blocks the thread, then setting a deadline allows the flow to continue even though the click is technically not done.
Example
// Click myButton 10px from top and 10px from left
Fields["mybutton"].clickWithOffset(10, 10);
Support
ChromeDriverIEDriver- JavaDriver
- NativeDriver
Simulated Click
Will simulate a mouse-click on the given field. The difference between simulate-click and click is only relevant for Java applications where mouse-events can be generated directly (click) or as a series of injected events - mousedown, mouseclicked, mouseup (simulateClick).
Example
Fields["mybutton"].simulateClick();
Support
- ChromeDriver (from 1.9.0)
IEDriver- JavaDriver (from 1.17.11)
NativeDriver
Simulated click with offset
Will click on the given field offset by the amount given. It allows you to e.g. click in the middle of a table row or the corner of a button.
Example
// Click myButton 10px from top and 10px from left
Fields["mybutton"].simulateClickWithOffset(10, 10);
Support
ChromeDriverIEDriver- JavaDriver
- NativeDriver
Right click
Will right-click on the given field.
Parameters
optionsan optional options object, supports;deadlinethe time in ms to wait for the click to fail/succeed. If the click takes longer than the deadline to fail or succeed it will be reported as succeeding to the caller. The use-case for thedeadlineparameter is for example if the click launches a dialog which blocks the thread, then setting a deadline allows the flow to continue even though the click is technically not done.
Example
Fields["mybutton"].rightClick();
Support
- ChromeDriver (from 1.9.0)
IEDriver- JavaDriver (from 1.20)
- NativeDriver (from 1.20)
Right-click with offset
Will click on the given field offset by the amount given. It allows you to e.g. click in the middle of a table row or the corner of a button.
Parameters
optionsan optional options object, supports;deadlinethe time in ms to wait for the click to fail/succeed. If the click takes longer than the deadline to fail or succeed it will be reported as succeeding to the caller. The use-case for thedeadlineparameter is for example if the click launches a dialog which blocks the thread, then setting a deadline allows the flow to continue even though the click is technically not done.
Example
// Click myButton 10px from top and 10px from left
Fields["mybutton"].rightClickWithOffset(10, 10);
Support
ChromeDriverIEDriver- JavaDriver
- NativeDriver
Double click
Will double-click on the given field.
Parameters
optionsan optional options object, supports;deadlinethe time in ms to wait for the click to fail/succeed. If the click takes longer than the deadline to fail or succeed it will be reported as succeeding to the caller. The use-case for thedeadlineparameter is for example if the click launches a dialog which blocks the thread, then setting a deadline allows the flow to continue even though the click is technically not done.
Example
Fields["mybutton"].doubleClick();
Support
- ChromeDriver (from 1.9.0)
IEDriver- JavaDriver (from 1.20)
- NativeDriver (from 1.20)
Double-click with offset
Will click on the given field offset by the amount given. It allows you to e.g. click in the middle of a table row or the corner of a button.
Parameters
optionsan optional options object, supports;deadlinethe time in ms to wait for the click to fail/succeed. If the click takes longer than the deadline to fail or succeed it will be reported as succeeding to the caller. The use-case for thedeadlineparameter is for example if the click launches a dialog which blocks the thread, then setting a deadline allows the flow to continue even though the click is technically not done.
Example
// Click myButton 10px from top and 10px from left
Fields["mybutton"].doubleClickWithOffset(10, 10);
Support
ChromeDriverIEDriver- JavaDriver
- NativeDriver
Click cell
Click in a cell in table (only applicable for tables).
Parameters
rowMatcha text to match in the rowcolMatcha text to match in a column headeroptionsan options object on which the follow properties can be set;deadlinethe time in ms to wait for the click to fail/succeed. If the click takes longer than the deadline to fail or succeed it will be reported as succeeding to the caller.reflectionDepthindicates how deep to do the search for therowMatchvalue (also see Reflection depth)useCachedUIboolean indicating if UI component lookup should use the UI itself or the underlying model. Defaults tofalse(underlying model traversal).
Example
// Click in the cell defined by its row containing 'A' and its column (header) containing 'B'
Fields["myTable"].clickCell('A', 'B');
// The same command but use reflection depth to do a deeper search
Fields["myTable"].clickCell('A', 'B', { reflectionDepth: 2 });
Support
ChromeDriverIEDriver- JavaDriver (from 1.20)
NativeDriver
Read
Will read the value of the field. Depending on the type of the field the behavior will differ, e.g. on a label it will return the text content of the label, for a text-field it will return the contents of the text-field. For a more complex container type it will return a JSON representation of the control (which can be natively accessed in the flow as an object). See JSON serialisation for details on how different types are serialised.
Parameters
optionsan optional options object with details regarding the inspection.useCachedUIboolean indicating if UI component lookup should use the UI itself or the underlying model. Defaults tofalse(underlying model traversal).
Example
var contents = Fields["mytextfield"].read();
Support
- ChromeDriver
- IEDriver (complex content not supported)
- JavaDriver
- NativeDriver
Exists
Returns true if the field could be found.
Example
if(Fields["mytextfield"].exists()) {
  ...
}
Support
- ChromeDriver
- IEDriver
- JavaDriver
- NativeDriver
Inspect
Inspect a given field. The returned object will contain misc information about the field - the type of information depends on the type of the field.
Parameters
optionsan optional options object with details regarding the inspection.useCachedUIboolean indicating if UI component lookup should use the UI itself or the underlying model. Defaults tofalse(underlying model traversal).reflectionDepth(see below)
Reflection depth
You can optionally obtain more detailed information about the data in eg treeviews. To do this, pass a positive reflectionDepth value as shown in the examples below.
As an example, reflectionDepth: 3 means the result includes fields such as arrival.date.day (3 steps) but not eg patient.eyes.left.tla (4 steps).
The reflectionDepth paramater affects the data available in the output under the objects in the control in question (eg treeview nodes). The main use of
this feature is to determine which patterns to use with Field['field'].select() when simply selecting the rendered text doesn’t work.
Example
var info = Fields["mytextfield"].inspect();
// See which information was returned
Debug.showDialog(JSON.stringify(info));
// If info has a `text` property, then this will show the text
Debug.showDialog(info.text);

var detailedInfo = Fields["myTreeView"].inspect({ reflectionDepth: 2});
// This object includes extra data under the nodes of 'myTreeView'.
Debug.showDialog(JSON.stringify(detailedInfo));
Support
ChromeDriverIEDriver- JavaDriver (from 1.17.0)
NativeDriver
Input
Input a text value into a textfield/textbox/etc.
Parameters
textthe text to inputoptionsan optional options object with details regarding the inspection.useCachedUIboolean indicating if UI component lookup should use the UI itself or the underlying model. Defaults tofalse(underlying model traversal).
Example
Fields["mytextfield"].input("some text");
Support
- ChromeDriver
- IEDriver
- JavaDriver
- NativeDriver
Native input
Inputs text into a field using native events, i.e. simulating keyboard input. This is useful for fields which does validation (e.g. date-fields or similar). Use only if the input method does not work.
Parameters
textthe text to input - you can use<backspace>to indicate a backspace/delete action
Example
Fields["mydatefield"].inputNative("11112011");
Fields["mydatefield"].inputNative("123<backspace>"); // field will contain '12'
Support
- ChromeDriver
IEDriver- JavaDriver
NativeDriver
Native input with delay
Inputs text into a field using native events with a given delay between each keystroke simulating keyboard input. This is useful for fields which does validation (e.g. date-fields or similar). Use only if the input method does not work.
Parameters
textthe text to inputdelaythe number of milliseconds to wait between each “keystroke”
Example
Fields["mydatefield"].inputNativeWithDelay("some text", 100);
Support
- ChromeDriver
IEDriver- JavaDriver
NativeDriver
Select
Select a value. This only works for dropdowns, listboxes and tree-views.
Note that for tree-views the value given to this function may be an expression which matches the path to a leaf. E.g. for the following tree:
tree
├── a
│   └── b
│       └── c
├── d
└── x
    └── y
The node c may be selected by:
Fields["tree"].select("a/b/c");
Parameters
valuethe value to select. By defaultvalueis treated as a regular expression, where characters like.,*and(have special meaning. If you want a literal match you need to surroundvaluewith<<and>>, e.g.select('<<'+v+'>>')wherevis the literal value to match.optionsan optional options object with details regarding the selection.deadlinethe time in ms to wait for the select to fail/succeed. If the select takes longer than the deadline to fail or succeed it will be reported as succeeding to the caller.reflectionDepthan option indicating how far the select matching should dive into java objects (eg treeview nodes). Setting this too high may negatively affect performance. Defaults to 0. Use theinspectmethod to determine how to match against this information and what an appropriate (minimal) reflection depth is.useCachedUIboolean indicating if UI component lookup should use the UI itself or the underlying model. Defaults tofalse(underlying model traversal).
Example
// Select "option1" and use reflectionDepth to to try and find "option1"
Fields["mytree"].select("option1", { reflectionDepth: 2 });
Support
- ChromeDriver
- IEDriver
- JavaDriver
- NativeDriver (untested)
Select with index
Select a value based in an index. This only works for dropdowns, listboxes and tree-views.
Parameters
indexis the index in the combo, listbox or tree to select.optionsan optional options object with details regarding the selection.useCachedUIboolean indicating if UI component lookup should use the UI itself or the underlying model. Defaults tofalse(underlying model traversal).
Example
Fields["mycombo"].selectIndex(5);
Support
ChromeDriverIEDriver- JavaDriver (from 1.11.0)
- NativeDriver (from 1.11.0)
Select with offset
Select a value (with an offset). This only works for dropdowns, listboxes and tree-views.
Parameters
valuethe value to base selection on. The value needs only to partially match the shown option to be selected, e.g. using “utte” in a list containing the item “butter” will select it.offset(int) the offset which will be used to do actual selection. E.g. if “1” then the next element (which was found using value will be selected).
Example
Fields["mytree"].selectWithOffset("option1", 1);
Support
ChromeDriverIEDriver- JavaDriver (from 1.9.0)
NativeDriver
Select with offset and skip
Select a value (with an offset and skip). This only works for dropdowns, listboxes and tree-views.
Parameters
valuethe value to base selection on. The value needs only to partially match the shown option to be selected, e.g. using “utte” in a list containing the item “butter” will select it.offset(int) the offset which will be used to do actual selection. E.g. if “1” then the next element (which was found using value will be selected).skipwill select the N’th match to start from. E.g.1will skip the first match and select the 2nd.
Example
Fields["mytree"].selectWithOffsetAndSkip("option1", 1, 1);
If used on e.g. a combobox with options; [“option1”, “option2”, “option1”, “option3”] the code-fragment above will select “option3”. This is done by first looking for all “option1”s. Then skip 1 this will get you the 2nd “option1”, then offset by 1 which will get you “option3”.
Support
ChromeDriverIEDriver- JavaDriver (from 1.9.2)
NativeDriver
Edit cell
Can be used in a table to edit a given cell.
Parameters
rowthe row in which to find the cell (match any cell in the row)columnthe column in which to find the cell (must match a single column)valuethe value to put into the cell (works with textfield and dropdowns)optionsis an optional argument, which can contain:reflectionDepthused to finding the value if there is e.g. a combobox in the cell to edit (also see Reflection depth)useCachedUIboolean indicating if UI component lookup should use the UI itself or the underlying model. Defaults tofalse(underlying model traversal).
Example
Given the following table:
| header 1 | header 2 |
|---|---|
| cell 1 | cell 2 |
| cell 3 | cell 4 |
This command:
Fields["mytable"].editcell("cell 3", "header 2", "boom");
Will result in this table:
| header 1 | header 2 |
|---|---|
| cell 1 | cell 2 |
| cell 3 | boom |
Highlight
Highlight the given field with the default color.
Example
Fields["myfield"].highlight();
Support
- ChromeDriver
- IEDriver
JavaDriver- NativeDriver
Highlight with color
Highlight the given field with the given color. Available colors are red, green and blue.
Parameters
colorthe highlighting color -red,greenorblue.
Example
Fields["myfield"].highlightWithColor("blue");
Support
- ChromeDriver
- IEDriver
- JavaDriver
- NativeDriver
Lowlight
Cancel a highlight on a field.
Example
Fields["myfield"].lowlight();
Support
- ChromeDriver
- IEDriver
JavaDriverNativeDriver
Global objects
The global objects listed below are available in all flows.
Dialog
The dialog object contains methods for presenting the user with information or requesting information from the user at runtime.
Info dialog
Shows a blue information dialog with an OK button. The flow does not proceed until the user has clicked OK. Options is an optional parameter.
Parameters
headeris the title of the dialogtextis the text content shownoptionsis a JavaScript object, supported properties:buttonsis an array of buttons to display in the bottom part of the dialogtimeoutan int determining when the dialog should auto-closesounda string (one ofasterisk,beep,exclamation,hand,question) which indicates a system sound to play once the dialog is shown
The buttons array consists of button objects with the following properties:
valuethe text to display on the button (should be unique for a dialog)isDefault(boolean) a true/false value indicating whether or not this button is the default (i.e. will be activated on the enter-key) - should only be set totruefor one button per dialog – default isfalseisCancel(boolean) indicating whether or not the button should cancel the dialog – default isfalse
The default value for buttons is an “OK” button:
[
  { 'value': 'OK' }
]
The button clicked will be available as a property named button on the return value from the dialog. If the user clicks a cancel button then an exception is thrown.
Example
Dialog.info("Hello", "This is some text to be shown.", {});
With options:
Dialog.info(
  "Hello",
  "Some text - I will max be shown for 10 secs.",
  { timeout: 10 }
);
With pre-defined buttons:
var r = Dialog.info(
  "Hello",
  "Do you want to continue",
  { timeout: 10
  , buttons: [
      { 'value': 'No', 'isCancel': true },
      { 'value': 'Maybe' },
      { 'value': 'Yes' },
    ]
  }
);
if (r.button == 'Yes') {
  // user answered yes - we can continue
  ...
}
Support
- ChromeDriver
- IEDriver
- JavaDriver
- NativeDriver
Warn dialog
Shows a red warning dialog to the user with an OK button. Similar to the info dialog, but red. Options is an optional parameter.
Parameters
headeris the title of the dialogtextis the text content shownoptionsis a JavaScript object, supported properties:buttonsis an array of buttons to display in the bottom part of the dialog (see info-dialog for further information)timeoutan int determining when the dialog should auto-closesounda string (one ofasterisk,beep,exclamation,hand,question) which indicates a system sound to play once the dialog is shown
Example
Dialog.warn("Warning!!", "This is some text to be shown. Consider yourself warned.");
Support
- ChromeDriver
- IEDriver
- JavaDriver
- NativeDriver
Input dialog
Shows a dialog into which the user may input data. The type of data which can be input is determined by the options parameter.
Parameters
headeris the title of the dialogtextis the text content shownoptionsis a JavaScript object which determines the input the user should provide. Each property on the object is one input the user must provide. The name of each property is used when returning the results. Each input should contain the following variables:buttonsis an array of buttons to display in the bottom part of the dialog (see info-dialog for further information)typeto determine which UI element to display,TEXT,PASSWORD,FILE,SELECT,RADIO,DATE,MULTITEXT,TYPEAHEAD,HEADER,DIVIDERandDESCRIPTIONare the supported options - see options for each type belowmaxDialogWidth/maxDialogHeight(int) change the default maximum width and height for the window,dependsOnis an expression that determines when this input should be shown. You can either specify the name of another property - in which case the input will be shown if the other property has a value, or you can specify a<name-of-other-property>=<value>type string - in which case the input will be shown if the other property has the given value. IfdependsOnis empty the input will always be shown. Using a~instead of=in the expression will cause the value to be interpreted as a regular expression (from 1.8.0).promptWidthsets the with of the label/promptsubmitOnValidationis a boolean flag that determines whether or not the dialog will be automatically submitted when all fields validate - or notsounda string (one ofasterisk,beep,exclamation,hand,question) which indicates a system sound to play once the dialog is shown- furthermore the buttons option is also allowed:
buttonsis an array of buttons to display in the bottom part of the dialog (see info-dialog for further information)
Further options depends on the value of type:
TEXT and PASSWORD
promptis the text which is displayed as an hint to the user for this option.promptAlignmentis the alignment the prompt should follow. Available options are: “Center”, “Justify”, “Left” (default), “Right”.valueis an optional default value for the input.prefixandsuffixare texts to be shown before and after the input field.focusis whether to focus this field - if multiple fields have focus set to true then the last one will be focused.multilinewhether multiple lines are allowed (defaultfalse).validationis a validation object (see below).
FILE and DATE
promptis the text which is displayed as an hint to the user for this option.valueis an optional default value for the input.focusis whether to focus this field.validationis a validation object (see below).
SELECT and RADIO
promptis the text which is displayed as an hint to the user for this option,valueis an optional default value for the input,selectedis whether or not the option starts out as selected (checked) or not - only applicable forSELECTselectBetweenis a array of strings which determines the available dropdown options if thetypehas valueSELECT,focusis whether to focus this fieldvalidationis a validation object (see below).
HEADER and DESCRIPTION
valueis used as the text displayed.
MULTITEXT
textsis an array of text inputs to show - each input may have the following properties set;nameis used to refer to the input,prefixandsuffixare texts to be shown before and after the input field,valueis the default value,multilinewhether multiple lines are allowed (defaultfalse)focusis whether to focus this fieldvalidationis a validation object (see below).
TYPEAHEAD
selectFromis the construction which determines what the user is able to select from.
The value of selectFrom can be a list of strings in which case the list is simply displayed. E.g.:
...
myProp: {
  type: 'TYPEAHEAD',
  selectFrom: ['Option 1', 'Option 2']
}
...
It can be a list of objects with a value or display property that is displayed for the user. As in the example below where the user can select or get auto-completion on ‘a’ and ‘b’.
...
myProp: {
  type: 'TYPEAHEAD',
  selectFrom: [
    {display: 'a', id: 100},
    {display: 'b', id: 100}
  ]
}
...
The value of the myProp property after the input dialog is completed will be the full object selected, e.g. {display: 'a', id: 100}.
You can also supply arbitrary objects and a formatting string.
...
myProp: {
  type: 'TYPEAHEAD',
  selectFrom: {
    format: '{{foo}} with id {{id}}',
    items: [
      {foo: 'a', id: 100},
      {foo: 'b', id: 100}
    ],
  }
}
...
This will display e.g. “a with id 100” in the suggestion dropdown. The object selected will be available in the myProp property (not just the formatted string). In addition to the format string, you can also set the following options:
minInputLengththe minimum number of characters the user must input in order to get suggestionsfilterModewhich mode should be used to filter the suggestions; select from'contains','startswith','endswith'.
A callback function can also be used. The function supplied will get invoked with the string entered by the user. E.g.:
...
myProp: {
  type: 'TYPEAHEAD',
  selectFrom: {
    format: '{{foo}} with id {{id}}',
    items: function(searchString) {
      return [
        {foo: 'a', id: 100},
        {foo: 'b', id: 100}
      ];
    },
  }
}
...
In this case we’re not using the input for anything but other cases might do so, like when fetching options from e.g. a remote resource (via http or similar).
Lastly, the contents of a Table can be used as options.
...
myProp: {
  type: 'TYPEAHEAD',
  selectFrom: Table.map('nameOfTable', 'propToIndexBy').selectFrom('{{foo}} with id {{id}}')
}
...
This will use the table rows and generate a formatted string for each row - the result will again be an object representing the row.
DIVIDER
The DIVIDER type does not support any options.
Validation
Input fields may have a validation object in their options which determines valid values for the inputs. The validation object has the following properties;
isRequiredboolean value indicating whether a value must be supplied for the field,regexis a regular expression which must match the given input in order for the field to validate,messageis an optional message to be displayed in case validation fails.
Use either isRequired or regex, not both at the same time.
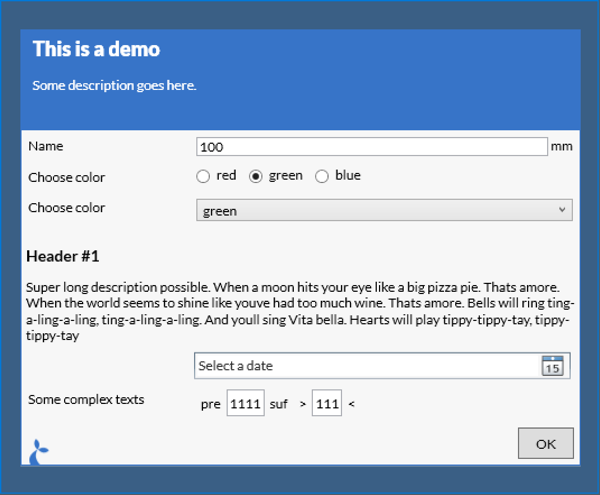
Example
var result = Dialog.input(
  'This is a demo',
  'Some description goes here.', {
    'submitOnValidation': true,
    'maxDialogHeight': 1000,
    'maxDialogWidth': 2000,
    'name': {
      'prompt': 'Name',
      'type': 'TEXT',
      'suffix': 'mm'
    },
    'colorRadio': {
      'prompt': 'Choose color',
      'type': 'RADIO',
      'selectBetween': ['red', 'green', 'blue']
    },
    'foo': {
      'prompt': 'Show only on blue',
      'dependsOn': 'colorRadio=blue',
      'type': 'TEXT'
    },
    'colorCombo': {
      'prompt': 'Choose color',
      'type': 'SELECT',
      'selectBetween': ['red', 'green', 'blue'],
      'validation': {'isRequired': true, 'message': "Color must be selected"}
    },
    'header' : {
      'type': 'HEADER',
      'value': 'Header #1'
    },
    'desc': {
      'type': 'DESCRIPTION',
      'value': 'Super long description possible. When a moon hits your eye like a big pizza pie. Thats amore. When the world seems to shine like youve had too much wine. Thats amore. Bells will ring ting-a-ling-a-ling, ting-a-ling-a-ling. And youll sing Vita bella. Hearts will play tippy-tippy-tay, tippy-tippy-tay'
    },
    'date': {
      'type': 'DATE'
    },
    'multi': {
      'type': 'MULTITEXT',
      'prompt': 'Some complex texts',
      'texts': [
        { 'name': 'a', 'prefix': 'pre', 'suffix': 'suf', 'validation': { 'regex': 'a+', 'message': 'Must contain at least one \"a\"' } },
        { 'name': 'b', 'prefix': '>', 'suffix': '<' }
      ]
    }
  }
);
// Now use the input values for something
var name = result.name;
var eyecolor = result.colorRadio;
This will result in the dialog shown below.
Support
- ChromeDriver
- IEDriver
- JavaDriver
- NativeDriver
HTML based input dialog
In addition to the normal native input function we also support using HTML input forms. This approach does not bring as much built-in functionality - validation, conditional displays etc - but offers a larger degree of customization in the appearance of the displayed form. It works by taking the form, either HTML directly or a URL to a page containing the form and then displaying this in a dialog. When the user accepts the form (clicks “ok”) the page is parsed and information about the contents of the individual fields are extracted for use in the flow.
The input values entered can be retrieved from the dialog result by using the name or id property of the input element. For more info on forms see e.g. https://developer.mozilla.org/en-US/docs/Learn/HTML/Forms. For a concrete example with a number of different input elements see e.g. http://sirenia.eu/tutorial/form.html.
Parameters
header- [string] the header to displaytext- [string] a longer text to displayoptions- [object] containing options for the dialog itself:source- [string] the form to display - either HTML directly or a URLembed- [bool] if true, manatee will add some styling and html/body tags to the page, if false nothing is addedmaxDialogWidth- [int] the max width the dialog must takemaxDialogHeight- [int] the max height the dialog must take
Example
Source directly as an option.
var result = Dialog.inputHtml(
  'Header',
  'Some more text',
  {
    source: "<input type='text' id='myText'></input>",
    embed: true
  });
// The result will have a `myText` property since we added the `id` property with the value to the input field
Debug.showDialog("Result was "+result.myText);
Using a remote document.
var result = Dialog.inputHtml(
  'Header',
  'Some more text',
  {
    source: "http://sirenia.eu/tutorial/form.html",
    embed: true
  });
// The result will have a `myText` property since we added the `id` property with the value to the input field
Debug.ger(result);
Support
- ChromeDriver (from 1.22)
- IEDriver (from 1.22)
- JavaDriver (from 1.22)
- NativeDriver (from 1.22)
Flow
The flow object provides a mechanism to invoke other flows. This allows some flows to become superflows connecting multiple flows together. Flows from other applications may also be invoke in this fashion.
Shared functionality
You can use the include(...) method to include code from a MODULE typed flow. This is great if you have some code that you want to share between multiple flows.
The code in the module flow can export its functionality by assigning variables to the global exports object. See the example below.
Parameters
namethe name or subject of the module to include
Examples
We’ll define a handy math module (given the subject = math):
var times = function(a, b) {
  return a*b;
}

var plus = function(a, b) {
  return a+b;
}

var bigNumber = 10000;

exports.times = times;
exports.plus = plus;
exports.bn = bigNumber;
and this can then be used in another flow:
var math = Flow.include('math');
var ten = math.times(2, 5);
Support
- ChromeDriver (from v1.25)
- IEDriver (from v1.25)
- JavaDriver (from v1.25)
- NativeDriver (from v1.25)
Run flow
Run another flow with the run(...) method. You provide the input to the flow and will get the outputs of the flow.
Parameters
namethe name of the flow to run - if there are 0 or more than 1 flow with this name anErrorwill be thrownenvironmentis a JavaScript object containing the input to the flow. Each property on the object will be mapped to an input. Currently only string values are supported. Inputs are accessed in the running flow withInputs["<inputname>"]e.g.Inputs["myinput"]or simply<inputname>e.g.myinput(if theis a valid JavaScript identifier).
Examples
Simple
var result = Flow.run("MyOtherFlow", { "inputA": "AAA", "inputB": "BBB" });
// "MyOtherFlow" will now get executed, the inputs may be accessed via e.g. Inputs["inputA"] in "MyOtherFlow"
var outputC = result.outputC; // providing "MyOtherFlow" has a defined output called "outputC"
Chaining flows
It is possible to chain flows like:
var result = Flow.run("RunLast", Flow.run("RunFirst", {}));
Support
- ChromeDriver
- IEDriver
- JavaDriver
- NativeDriver
Wait
Wait for seconds
Wait the given amount of seconds.
Parameters
timeoutthe number of seconds to wait
Example
Wait.forSeconds(2);
Support
- ChromeDriver
- IEDriver
- JavaDriver
- NativeDriver
Wait for milliseconds
Wait the given amount of milliseconds.
Parameters
timeoutthe number of milliseconds to wait
Example
Wait.forMilliseconds(200); // Wait for 0.2 seconds
Support
- ChromeDriver
- IEDriver
- JavaDriver
- NativeDriver
Wait for field
Wait for the given field to appear - will return when field appear or throw an exception when the given amount of seconds has elapsed.
Parameters
fieldthe field to wait for e.g.Fields["myfield"]timeoutthe max amount of seconds to wait for the field to appear
Example
Wait.forField(Fields["myfield"], 10);
Support
- ChromeDriver
IEDriver- JavaDriver
NativeDriver
Wait for field to disappear
Wait for the given field to disappear - will return when field disappears or throw an exception when the given amount of seconds has elapsed.
Parameters
fieldthe field to wait for e.g.Fields["myfield"]timeoutthe max amount of seconds to wait for the field to disappear
Wait.forFieldToDisappear(Fields["myfield"], 10);
Support
- ChromeDriver
IEDriver- JavaDriver
NativeDriver
Xml
The Xml module enables parsing information stored in local or remote xml files.
Load xml
Parse the given string as xml and return an XmlDoc object which can be queried or turned into JSON.
Parameters
xmlan xml formatted string to parse
Example
var d = Xml.load("<hello>world</hello>");
Support
- ChromeDriver (from 0.13.0)
- IEDriver (from 0.13.0)
- JavaDriver (from 0.13.0)
- NativeDriver (from 0.13.0)
Load XML from url
Fetch a local or a remote file and parse as xml. Returns an XmlDoc object.
Parameters
urlis a local or remote path to an xml file
Example
// A remote file
var remote = Xml.loadFrom("http://somewhere/over/the/rainbow.xml");
// A local file
var local = Xml.loadFrom("c:\\somewhere\over\the\rainbow.xml");
Support
- ChromeDriver (from 0.13.0)
- IEDriver (from 0.13.0)
- JavaDriver (from 0.13.0)
- NativeDriver (from 0.13.0)
XmlDoc
An XmlDoc is an object that wraps an xml document and which has a few functions for querying the underlying document.
XPath
Execute an XPath query and return the results. The result is a list of objects, each object represents the matching xml node.
Parameters
xpatha well-formed XPath expression
Example
var doc = Xml.load("<hello>world</hello>");
var allHellos = doc.xpath("//hello");
Support
- ChromeDriver (from 0.13.0)
- IEDriver (from 0.13.0)
- JavaDriver (from 0.13.0)
- NativeDriver (from 0.13.0)
JSON
Returns a JSON/JavaScript version of the document which can then be inspected in the flow.
Example
var doc = Xml.load("<hello>world</hello>");
var docObject = doc.json();
Support
- ChromeDriver (from 0.13.0)
- IEDriver (from 0.13.0)
- JavaDriver (from 0.13.0)
- NativeDriver (from 0.13.0)
HTTP
The Http module enables http requests to be sent within a flow.
GET
Send a HTTP GET request. Returns a reply object containing;
statusthe http status-codedataa string containing the data receivedheadersan object containing the headers received
Parameters
urlthe url to GEToptsoptions, an object which may contain the following properties:credentials(optional) for basic-auth - an object containing;userusername for the http resourcepasspassword for the http resource
headers(optional) an object defining additional headers to include in the requestuseragent(optional) a string overriding the default useragenttimeout(optional, default 60000) how many ms to wait for the request to completecontenttype(optional) the contenttype of the request
Example
// Anonymous
var reply = Http.get("http://somewhere/over/the/rainbow.txt", {});
if (reply.status == 200)  { // Status: OK
  ...
}
// With basic-auth user/pass
Http.get("http://somewhere/over/the/rainbow.txt", { 'credentials': {'username': 'John', 'password': 'ramb0' } });
Support
- ChromeDriver (from 0.18.0)
- IEDriver (from 0.18.0)
- JavaDriver (from 0.18.0)
- NativeDriver (from 0.18.0)
POST
Send a HTTP POST request. Returns a reply object containing;
statusthe http status-codedataa string containing the data received
Parameters
urlthe url to POST todataa string to POSToptsoptions, an object containing additation options for the request (see description in Http.get)
Example
// Anonymous
var reply = Http.post("http://somewhere/over/the/rainbow.txt", "data=123", {});
if (reply.status == 200)  { // Status: OK
  ...
}
Support
- ChromeDriver (from 0.17.0)
- IEDriver (from 0.17.0)
- JavaDriver (from 0.17.0)
- NativeDriver (from 0.17.0)
PUT
Send a HTTP PUT request. Returns a reply object containing;
statusthe http status-codedataa string containing the data received
Parameters
urlthe url to PUT todataa string to PUToptsoptions, an object containing additation options for the request (see description in Http.get)
Example
// Anonymous
var reply = Http.put("http://somewhere/over/the/rainbow.txt", "data=123" {});
if (reply.status == 200)  { // Status: OK
  ...
}
Support
- ChromeDriver (from 0.17.0)
- IEDriver (from 0.17.0)
- JavaDriver (from 0.17.0)
- NativeDriver (from 0.17.0)
DELETE
Send a HTTP DELETE request. Returns a reply object containing;
statusthe http status-codedataa string containing the data received
Parameters
urlthe url to DELETEoptsoptions, an object containing additation options for the request (see description in Http.get)
Example
// Anonymous
var reply = Http.delete("http://somewhere/over/the/rainbow.txt", {});
if (reply.status == 200)  { // Status: OK
  ...
}
Support
- ChromeDriver (from 0.17.0)
- IEDriver (from 0.17.0)
- JavaDriver (from 0.17.0)
- NativeDriver (from 0.17.0)
FTP
The Ftp module enables reading and writing files on ftp servers.
Read
Read a file.
Parameters
urlthe url to the file to readoptsoptions, an object which may contain the following properties:userusername for the ftp server, blank if anonymous access is allowedpasspassword for the ftp server
Example
// Anonymous
var data = Ftp.read("ftp://somewhere/over/the/rainbow.txt", {});
// With user/pass
var data = Ftp.read("ftp://somewhere/over/the/rainbow.txt", { 'user': 'John', 'pass': 'ramb0' });
Support
- ChromeDriver (from 0.13.0)
- IEDriver (from 0.13.0)
- JavaDriver (from 0.13.0)
- NativeDriver (from 0.13.0)
Write
Write a file to a remote ftp server.
Parameters
urlthe url to the file to writedatathe content of the fileoptsoptions, an object which may contain the following properties:userusername for the ftp server, blank if anonymous access is allowedpasspassword for the ftp server
Example
Ftp.write("ftp://somewhere/over/the/rainbow.txt", "red, green, blue", {});
Support
- ChromeDriver (from 0.13.0)
- IEDriver (from 0.13.0)
- JavaDriver (from 0.13.0)
- NativeDriver (from 0.13.0)
Db
The Db module has functionality for connecting to databases. It currently supports sqlite, mssql and msaccess databases.
Connect
The connect method initialises a connection to a given database and returns a Database object.
Parameters
typethe type of the database, currently this should be “mssql”, “sqlite” or “msaccess”.connectionthe connection-string which contains information about how to connect to the database in question
Example
var db = Db.connect('sqlite', 'Data Source=C:\\MyFolder\\Test.db;Version=3;');
Support
- ChromeDriver (from 1.25)
- IEDriver (from 1.25)
- JavaDriver (from 1.25)
- NativeDriver (from 1.25)
Database
The database object returned from a Db.connect(...) invocation represents a database connection. It has two primary methods for interacting with a database; query and exec.
Exec
The exec method will execute a non-query (e.g. INSERT, UPDATE) and return the number of affected rows.
Example
var affectedRows = db.exec('CREATE TABLE Test (id int, name string)');
Query
The query method is used for queries (e.g. SELECT etc) and returns an array of objects representing the result of the query.
Example
var rows = db.query('SELECT id, name from Test');
for (var i=0; i<rows.length; i++) {
  Debug.showDialog("id="+row.id+", name="+row.name);
}
Begin
The begin() method is used to initiate a transaction.
Example
var tx = db.begin();
Transaction
A transaction object is conceptually similar to the database object. It has the same query and exec methods, but will delay the execution of the query or command until commit() is invoked and of course maintains transactional integrity. If the rollback() method is invoked the query and exec operations already made are discarded.
Commit
A commit() invocation will commit the tx to the db.
Example
tx.exec("INSERT INTO Test (id, name) VALUES (1, 'John')");
tx.exec("INSERT INTO Test (id, name) VALUES (2, 'Jane')");
// Commit John and Jane
tx.commit();
Rollback
A rollback() invocation will rollback the tx.
Example
tx.exec("INSERT INTO Test (id, name) VALUES (1, 'John')");
tx.exec("INSERT INTO Test (id, name) VALUES (2, 'Jane')");
// John and Jane are not needed anyways
tx.rollback();
Database
The database object returned from a Db.connect(...) invocation represents a database connection. It has two primary methods for interacting with a database; query and exec.
Exec
The exec method will execute a non-query (e.g. INSERT, UPDATE) and return the number of affected rows.
Example
var affectedRows = db.exec('CREATE TABLE Test (id int, name string)');
Csv
The Csv module can be used for parsing, manipulating and generating comma-separated files.
Parse
The parse method takes a csv formatted string and returns an array of objects or arrays - one for each row in the string. There is also a parseFile variant which is identical to the parse method except that it takes a filename as its first argument.
Parameters
contentthe csv stringoptionsprovides the options for the parser
The options object can have the following fields:
delimetersa list strings used to separate the columns of the content - default is[',',';']headercan be set totrueto indicate that a header is present in the first line of the content or you can set it to an- array of strings to provide the header manually (the first line is treated as normal data) or you can
- leave it or or set it to
null(the default) which will cause the parsed result to be an array of arrays instead of an array of objects
quotedFieldswhich will strip quotes from the data (if present in the content) - defaultfalse
Examples
var csv = Csv.parse('foo;bar\n100;200', {header: true})
The csv variable will now contain:
[
  { foo: 100, bar: 200 }
]
or if there is no header:
var csv = Csv.parse('100;200\n300;400', {})
The csv variable will now contain:
[
  [ 100, 200 ],
  [ 300, 400 ]
]
Support
- ChromeDriver (from 1.25)
- IEDriver (from 1.25)
- JavaDriver (from 1.25)
- NativeDriver (from 1.25)
Stringify
The stringify(arr, quoteStrings, delim) method will take an array of objects or an array of arrays generate a csv string.
Parameters
arrthe array to convert to a csv stringquoteStringsa boolean value indicating whether to add quotes to strings or not (defaultfalse)delimthe delimeter string to separate fields (default',')
Example
var arr1 = [['foo','bar'],[1,2]];
var arr2 = [{foo: 3, bar: 4}];
var csvStr1 = Csv.stringify(arr1);
var csvStr2 = Csv.stringify(arr2);
csvStr1 and csvStr2 will now both have the value foo,bar\n1,2.
Excel
Load
Load and parse and Excel spreadsheet. It can either return the entire spreadsheet or a selected range of cells. If the header option is set then the returned value will be be a map/object with the column names as keys - otherwise an array is used. If index is set then then values in the index column will be used as keys - otherwise an array is used. If both are set then both dimensions will use values as keys. See the examples below.
Parameters
filepath for an Excel spreadsheet to loadoptionsoptions for parsing the spreadsheet - use{}to return the entire spreadsheettabledefine a table to returnrangewhich range does the table reside in e.g.'A1:D20'headeris a boolean to determine if the top row of the header is a tableindexis a boolean to determine if the initial column is an index columnworksheetis the name of the sheet to load data from
Example with simple table
Given the following simple spreadsheet in the worksheet named ‘Sheet1’:
| cell 1 | cell 2 |
| cell 3 | cell 4 |
The following code will load the spreadsheet and pick out the value stored at cell1.
var table = Excel.load('myspreadsheet.xlsx', {});
var cell1 = table["Sheet1"][0][0];
Example with table with header defined by range
Given the table below, situated in worksheet “Sheet1” at A1:B3:
| header 1 | header 2 |
|---|---|
| cell 1 | cell 2 |
| cell 3 | cell 4 |
Use the following code to pick out cell4.
var table = Excel.load('myspreadsheet.xlsx', { table: { range: 'A1:B3', worksheet: 'Sheet1', header: true } });
var cell4 = table[2]['header 2']; // 3rd row (0 is first row), column with header 'header 2'
Example with both header and index
Given the table below, situated in worksheet “Sheet1” at A1:B3:
| header 1 | header 2 | |
|---|---|---|
| I1 | cell 1 | cell 2 |
| I2 | cell 3 | cell 4 |
Use the following code to pick out cell2.
var table = Excel.load('myspreadsheet.xlsx', { table: { range: 'A1:C4', worksheet: 'Sheet1', header: true, index: true } });
var cell2 = table['I1']['header 2'];
Support
- ChromeDriver
- IEDriver
- JavaDriver
- NativeDriver
Delete a sheet
Removes a single sheet from the workbook.
Parameters
filenamethe path to the excel file to be updatedsheetthe name of the sheet to delete
Example
Excel.deleteSheet('data.xlsx', 'Sheet1');
Support
- ChromeDriver (from 1.25.22)
- IEDriver (from 1.25.22)
- JavaDriver (from 1.25.22)
- NativeDriver (from 1.25.22)
Update single cell
Update the value stored in a single cell in a spreadsheet.
Parameters
filenamethe path to the excel file to be updated - if the file does not exist a new one will be createdsheetthe name of the sheet to updateaddressan “address” to a cell, e.g. “A1”valuethe value to write into the cell
Example
// write 1000 into A3 of Sheet1 in data.xlsx
Excel.updateCell('data.xlsx', 'Sheet1', 'A3', 1000);
Support
- ChromeDriver (from 1.18.25)
- IEDriver (from 1.18.25)
- JavaDriver (from 1.18.25)
- NativeDriver (from 1.18.25)
Update multiple cells
Update values stored in a spreadsheet. This method is a lot more performant than the single cell version if you need to store multiple values.
Parameters
filenamethe path to the excel file to be updated - if the file does not exist a new one will be createdsheetthe name of the sheet to updateaddressan “address” of the starting cellvaluesthe valued to write into the cells - this should be a 2 dimensional array (like a table)
Example
// The data to write
var data = [
  [10, 20, 30],
  [40, 50, 60]
];
// write data into data.xlsx, Sheet1 starting at A1
Excel.updateCells('data.xlsx', 'Sheet1', 'A1', data);
This will result in a table that looks like:
| A | B | C | |
|---|---|---|---|
| 1 | 10 | 20 | 30 |
| 2 | 40 | 50 | 60 |
Support
- ChromeDriver (from 1.18.25)
- IEDriver (from 1.18.25)
- JavaDriver (from 1.18.25)
- NativeDriver (from 1.18.25)
Settings
The Settings object contains values that can be read/written to affect the behaviour of a flow. The following properties are available:
CommandRetries(int - read+write) defines the number of times a command is retried before it is considered to fail. Default is3.CommandRetryDelays(Array- read+write) defines the delays in milliseconds between each retry. Default is [100, 200, 400, 800, 1600]. When the number of retries exceed the given delays the last value in this array is used for all overflowing retries.
Example writing a value
Settings.CommandRetryDelays = [100, 100, 100];
Example reading a value
var retries = Settings.CommandRetries;
Debug.showDialog("Retries: " + retries);
Log
Warn
Inserts a warning in the log.
Parameters
keythe key of the message - keep this as a constanttextthe text to insert
Example
Log.warn('greeting','hello there');
Support
- ChromeDriver
- IEDriver
- JavaDriver
- NativeDriver
Info
Inserts a informational line in the log.
Parameters
keythe key of the message - keep this as a constanttextthe text to insert
Example
Log.info('greeting','hello there');
Support
- ChromeDriver
- IEDriver
- JavaDriver
- NativeDriver
Set log level
Controls the log verbosity of the application driver.
Parameters
levelthe new log level. Must be one of the following: none, fatal, error, warn, info, debug.optionsoptional additional optionsuseStdOut(defaults to false) boolean value indicating if instrumentation log should go to the application stdout or to manatee log.
Example
Log.setDriverLogging('info', { useStdOut: true });
Support
- ChromeDriver
IEDriver- JavaDriver
NativeDriver
Window
The Window module has functionality for dealing primarily with the main window of an application. In contrast the Windows module supports interacting with all the windows on the desktop.
Title
Get the title of the main window.
Example
var title = Window.title();
Support
- ChromeDriver (from 1.15.0)
- IEDriver (from 1.7.8)
- JavaDriver (from 1.7.8)
- NativeDriver (from 1.7.8)
Minimize
Minimize the main window.
Example
Window.minimize();
Support
- ChromeDriver (from 1.15.0)
- IEDriver (from 1.15.0)
- JavaDriver (from 1.15.0)
- NativeDriver (from 1.15.0)
Is minimized
Check if the main window is minimized.
Example
if(Window.isMinimized()) {
  ...
}
Support
- ChromeDriver (from 1.23.0)
- IEDriver (from 1.23.0)
- JavaDriver (from 1.23.0)
- NativeDriver (from 1.23.0)
Maximize
Maximize the main window.
Example
Window.maximize();
Support
- ChromeDriver (from 1.15.0)
- IEDriver (from 1.15.0
- JavaDriver (from 1.15.0)
- NativeDriver (from 1.15.0)
Is maximized
Check if the main window is maximized.
Example
if(Window.isMaximized()) {
  ...
}
Support
- ChromeDriver (from 1.23.0)
- IEDriver (from 1.23.0)
- JavaDriver (from 1.23.0)
- NativeDriver (from 1.23.0)
Focus
Put focus on the main window.
Parameters
optionsoptional object with options for focus. Supported options:useCachedUIboolean indicating if UI component lookup should use the UI itself or the underlying model. Defaults tofalse(underlying model traversal).
Example
Window.focus();
Support
- ChromeDriver (from 1.15.0)
- IEDriver (from 1.15.0
- JavaDriver (from 1.15.0)
- NativeDriver (from 1.15.0)
Send keys
Send keyboard events (simulated typing) to a window. Supports special strings for sending special keys.
Parameters
keysthe keys to send - this is a stringoptionsoptional object with options for sendkeys, supported options:focus[bool] whether to focus the window prior to sending the keys
Example
Window.sendKeys("foo bar");
// or to focus the window prior to sending the keys
Window.sendKeys("foo bar", { focus: true });
Support
- ChromeDriver (from 1.20)
- IEDriver (from 1.20)
- JavaDriver (from 1.20)
- NativeDriver (from 1.20)
Restore
Restore the main window to a previous state and location.
Example
Window.restore();
Support
- ChromeDriver (from 1.15.0)
- IEDriver (from 1.15.0
- JavaDriver (from 1.15.0)
- NativeDriver (from 1.15.0)
Window with modal dialog shown
Get whether or not a modal (dialog) is shown.
Example
var modalIsShown = Window.modalShown();
Support
ChromeDriverIEDriver- JavaDriver (from 1.12.0)
NativeDriver
Shown with title
Get whether or not a window with the given title is shown.
Example
var windowIsShown = Window.withTitleShown("My Window");
Support
ChromeDriverIEDriver- JavaDriver (from 1.12.0)
NativeDriver
Dim
Dims the window owned by the flow.
Parameters
levelthe amount of dimming, 0-255. 255 is opaque and 0 is transparent.
Example
Window.dim(100)
Support
- ChromeDriver
- IEDriver
- JavaDriver
- NativeDriver
Windows
The Windows module has functionality to inspect and manipulate the Windows of the desktop.
All windows
The all() method will return an array of window proxy objects representing all windows on the desktop.
Example
var allWindows = Windows.all();
Support
- ChromeDriver (v1.25)
- IEDriver (v1.25)
- JavaDriver (v1.25)
- NativeDriver (v1.25)
Windows for current application
The forApp() method returns an array of window proxy objects representing all the windows of the application.
Example
var applicationWindows = Windows.forApp();
Support
- ChromeDriver (v1.25)
- IEDriver (v1.25)
- JavaDriver (v1.25)
- NativeDriver (v1.25)
Primary window
The primary property returns a single window proxy object representing the primary or main window of the application.
Example
var pw = Windows.primary;
Support
- ChromeDriver (v1.25)
- IEDriver (v1.25)
- JavaDriver (v1.25)
- NativeDriver (v1.25)
Window Proxy
The window proxy object returned by the Windows module methods represents a desktop window and can be manipulated with the following methods and properties.
Move
Move the window to the given x,y coordinates.
var pw = Windows.primary;
// Move the window to (100,100) from the topmost left corner of the screen.
pw.move(100, 100);
Resize
Resize the window to the given dimensions.
var pw = Windows.primary;
pw.resize(100, 100);
Focus
Make the window the focused (topmost) window.
var pw = Windows.primary;
pw.focus();
Maximize
Maximize the window.
var pw = Windows.primary;
pw.maximize();
Minimize
Minimize the window.
var pw = Windows.primary;
pw.minimize();
Restore
Restore the original state of the window (after having maximized or minimized it).
var pw = Windows.primary;
pw.restore();
Screenshot
Grab a screenshot of the window. The screenshot will be returned as a base64 encoded string.
var pw = Windows.primary;
// img is a base64 encoded string
var img = pw.screenshot();
SendKeys
Send keyboard strokes to the window.
var pw = Windows.primary;
pw.sendKeys("abc");
Title
Get the title of the window.
var pw = Windows.primary;
var t = pw.title;
Class
Get the class of the window.
var pw = Windows.primary;
var t = pw.class;
IsPrimary
Get/set whether this window is considered the primary for the application.
var ws = Windows.forApp();
if (!ws[0].isPrimary) {
  ws[0].isPrimary = true;
}
IsMaximized
Get a boolean value indicating whether or not the window is maximized.
var ws = Windows.forApp();
if (!ws[0].isMaximized) {
  // do something then
}
IsMinimized
Get a boolean value indicating whether or not the window is minimized.
var ws = Windows.forApp();
if (!ws[0].isMinimized) {
  // do something then
}
Bounds
Get/set the bounds (location and size) of the window.
var pw = Windows.primary;
var bounds = pw.bounds;

// Move 10px left and down
bounds.x = bounds.x + 10;
bounds.y = bounds.y + 10;
// Decrease width and height with 10px
bounds.width = bounds.width - 10;
bounds.height = bounds.height - 10;

// Update the window bounds with the new values
pw.bounds = bounds;
Processes
The Processes module similarly to the windows module is used to enumerate and manipulate processes running on the local machine.
All processes
The all() methods enumerates all processes on the local machine. It returns an array of process proxy objects.
var ps = Processes.all();
for (var i=0; i<ps.length; i++) {
  // then do something with each process proxy
}
Current
Get the current process for the application (for which the flow is defined).
var p = Processes.current;
Debug.showDialog(p.name);
Spawning new processes
The spawn(...) method can be used to create new processes. It takes 3 arguments;
pathto the executable to launchargumentsfor the executable (optional - default null)working directory(optional - default null)shell(boolean) whether to launch the process in a shell environment - this must be set to true for url-handlers to activate (optional - default false)
It returns a process proxy object fronting the process spawned.
var p = Processes.spawn("C:\\Path\\To\Executable.exe");
Debug.showDialog(p.name);
Process proxy
Kill
Kills a process.
var p = Processes.all()[0];
p.kill();
Wait for a process to exit
The wait(...) method will wait for the given process to exit. It takes an integer, the maximum number of milliseconds to wait for the process as its argument. It returns a boolean indicating whether the processes exited (true) or the given timespan elapses (false).
// Wait max 1s for the first process to exit
if (Processes.all()[0].wait(1000)) {
  // it exited
} else {
  // 1s elapsed
}
Send input (via standard-in)
Sending some input to a running process is achieved with the stdin(...) method.
This can normally only be done for processes spawned by yourself via the Processes.spawn(...)](#spawning-new-processes) method.
var p = Processes.spawn(...);
p.stdin("hello");
Read from process output (standard-out)
Reading from the output of a process is done via the stdout(...) method. It takes an int - the number of lines to read - and returns a task which completes with the lines read as an array of strings once the given number of lines has been read.
This can normally only be done for processes spawned by yourself via the Processes.spawn(...)](#spawning-new-processes) method.
var p = Processes.spawn(...);
var lines = null;
// Read 3 lines, then kill the process
p.stdout(3).then(function(threelines) {
  lines = threelines;
  p.kill();
});
p.wait(20000);
Debug.ger(lines);
It is also possible to read from standard-error output - simply use the stderr(...) method instead of stdout(...).
Process Id
Get the id of the process.
var pid = Processes.current.id;
Process name
Get the name of the process.
var pname = Processes.current.name;
Process path
Get the path of the executable for the process.
var path = Processes.current.path;
Process working directory
Get the working directory of the executable for the process.
var pwd = Processes.current.wd;
Process mem usage
Get the virtual or private memory (integers) usage of the process.
var virtualMem = Processes.current.vmem;
var privateMem = Processes.current.pmem;
Process exited?
Gets a boolean indicating whether the process has exited.
if (Processes.current.exited) {
  // whoops
}
Process uptime
Gets the number of milliseconds elapsed since the process was spawned (as longs as it has not exited).
var uptime = Processes.current.uptime;
Debug
Show dialog
Show some text in a debug dialog. Essentially the same as Dialog.info("Debug", text).
Parameters
textthe text to display
Example
Debug.showDialog("hello there");
Support
- ChromeDriver
- IEDriver
- JavaDriver
- NativeDriver
ger
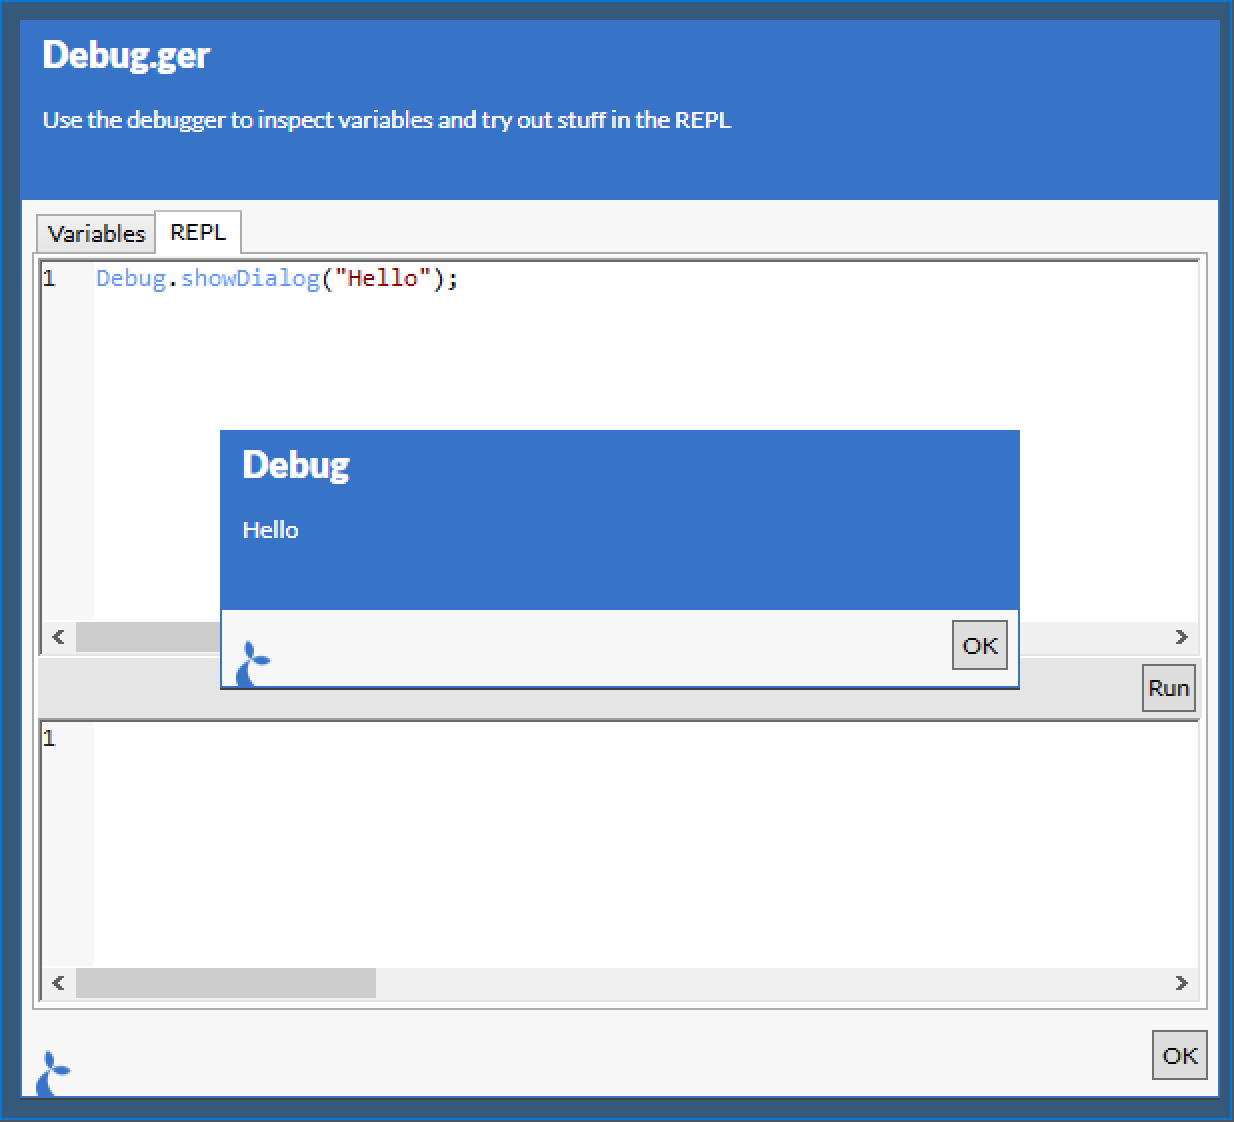
The Debug.ger() method pauses the running flow (as any other dialog) and shows a debugger dialog which includes an inspector and a REPL (read-eval-print loop).
Inspector
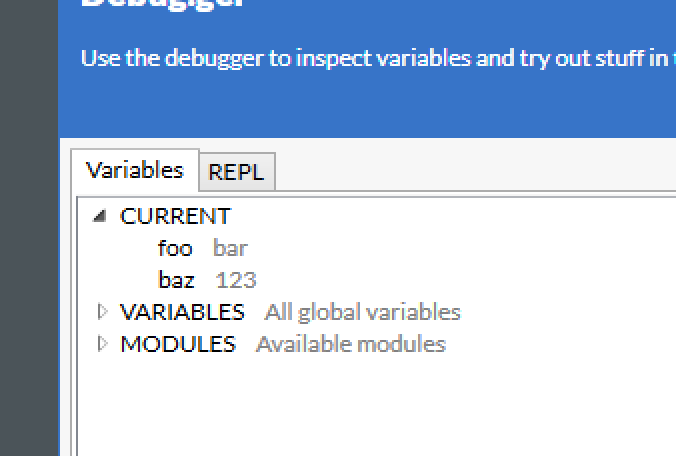
The inspector window lets you inspect the global values in the flow as well as the argument given. The variables are displayed in a tree which can be expanded to reveal the structure of the objects.

The debugger shown above was shown with the following code:
var x = { foo:'bar', baz: 123 };
Debug.ger(x);
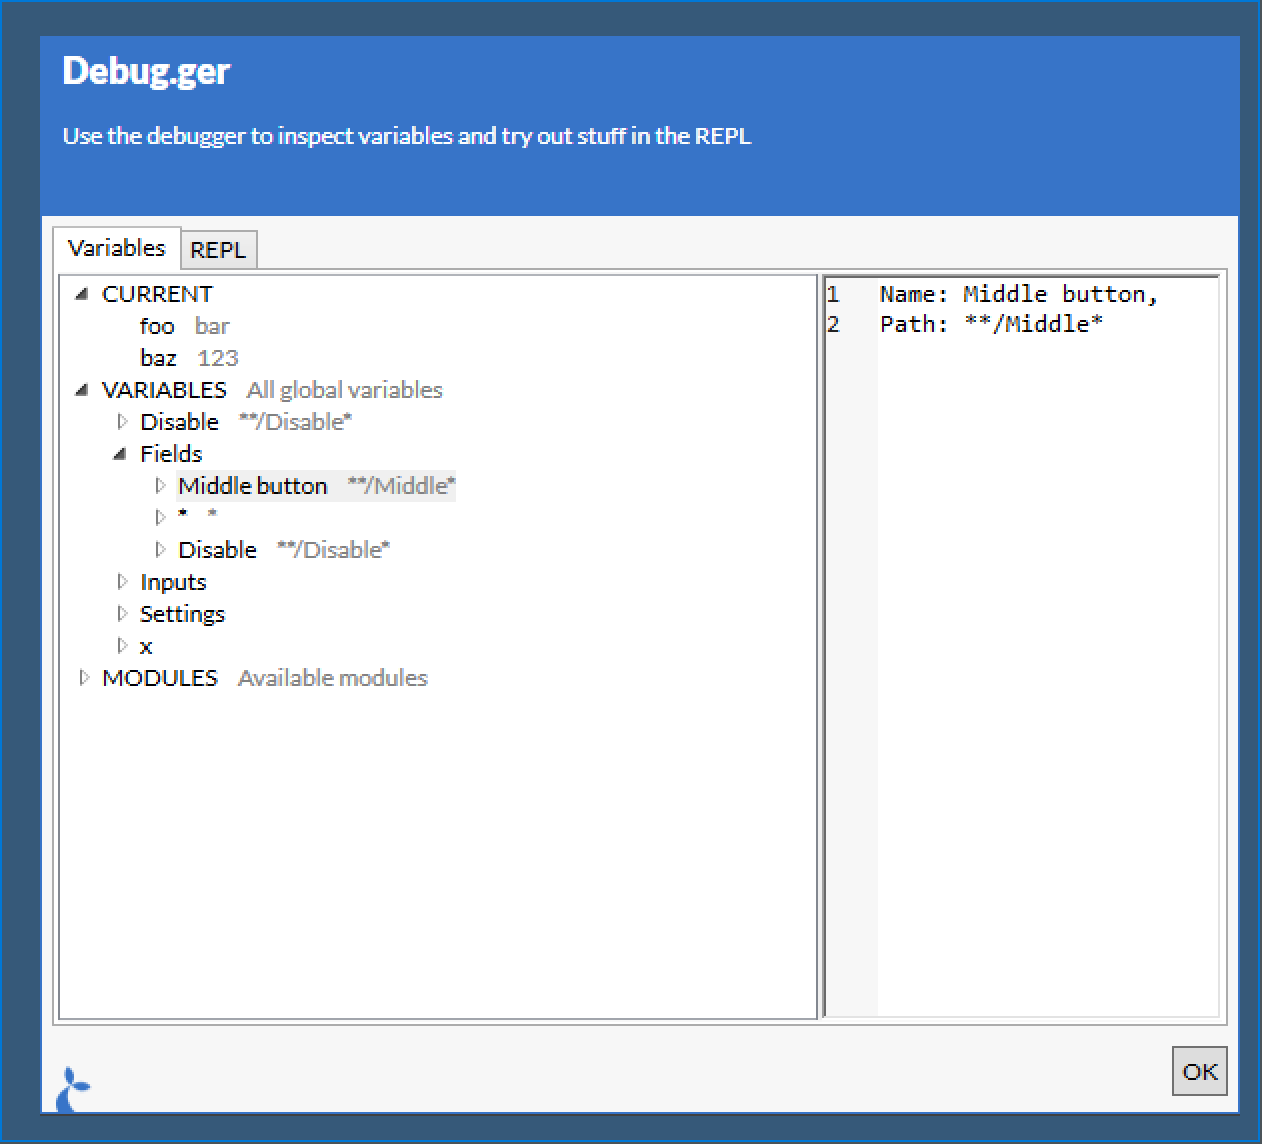
Expanding the CURRENT node will give you:
You can also explore the global variables (those defined in the outermost) scope of a flow. Here we show a field.
REPL
The REPL tab of the Debug.ger can be used to try running small snippets of code in the context of the current flow. You can do anything via the REPL that you can do in a flow.
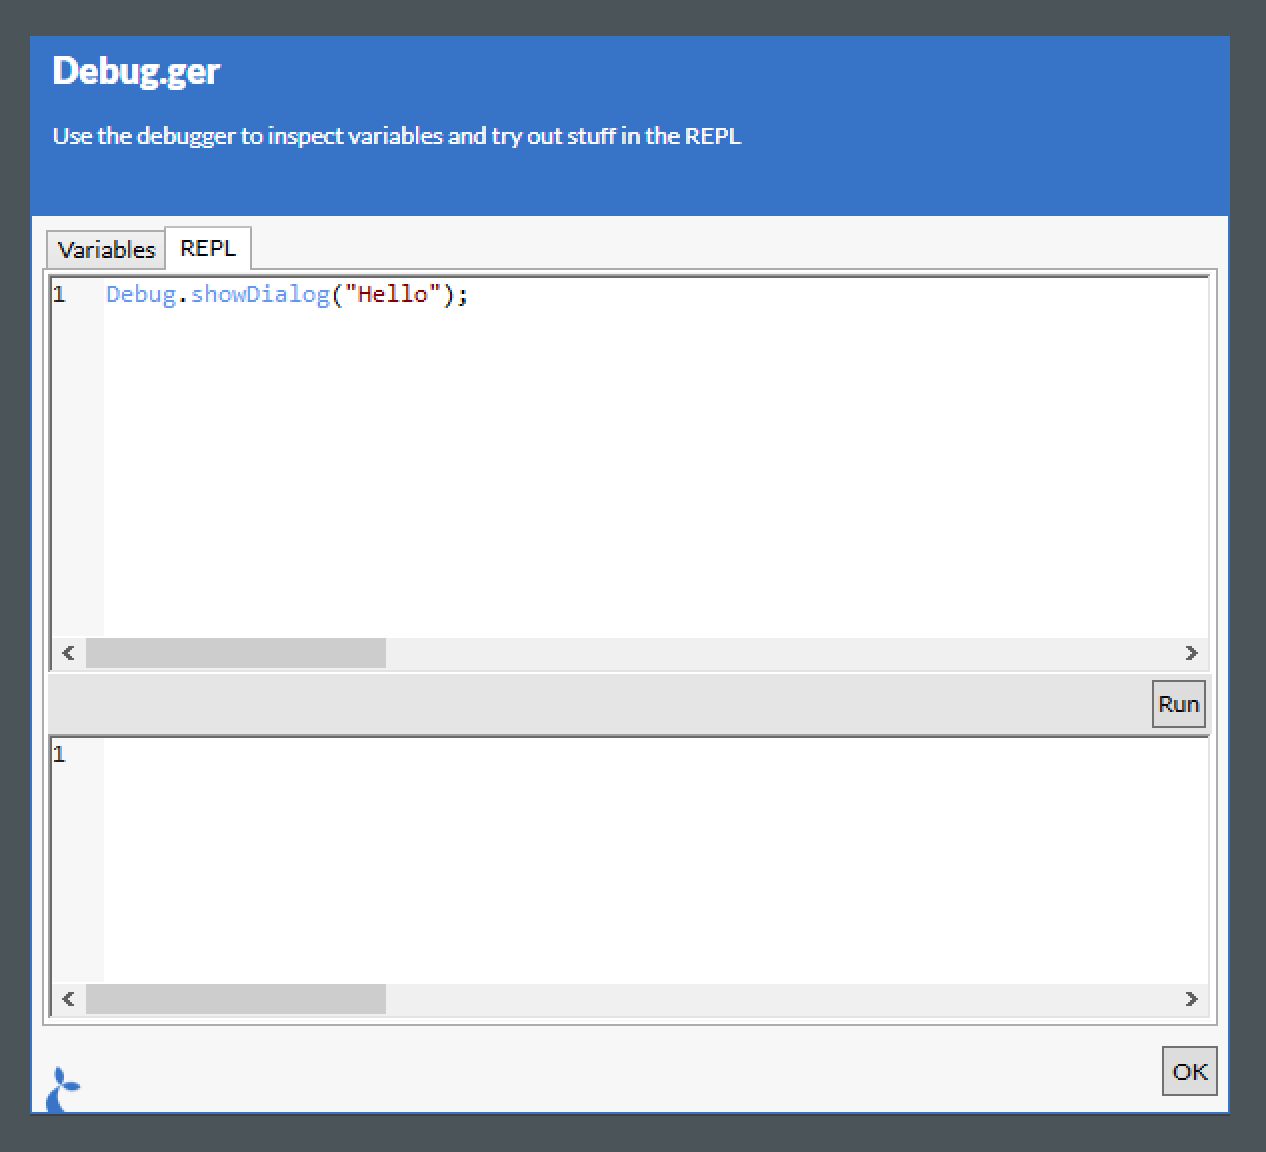
Clicking the “Run” button will run the code written and display the time it took to run as well as the result.
This method can also be used as Debug.attach() and Debug.inspect() but some of us prefer the simplicity and raw hipster essence of Debug.ger().
Fs
The Fs module is used to interact with the filesystem of the local machine.
Temp folder
The tmpfolder property holds the path to the temp folder.
Example
var folder = Fs.tmpfolder;
Support
- ChromeDriver (from 1.25)
- IEDriver (from 1.25)
- JavaDriver (from 1.25)
- NativeDriver (from 1.25)
List (ls)
Returns a list of files found in the directory given by the path argument. The path may contain wildcards * in its last segment.
A second option argument can be passed, which can have the boolean property deepMatch. When this property is set to true, files matching the filename given in the path argument in any sub-folder will be returned.
Default behavior is to do a shallow file listing.
Example
var files = Fs.ls('c:\\somedir\\somefile*.txt');
// Get all .txt files prefixed with somefile in somedir

var files = Fs.ls('c:\\somedir\\*.txt', { deepMatch: true });
// Get all .txt files in any sub directory under C:\somedir - at any depth
Support
- ChromeDriver (from 1.14.0)
- IEDriver (from 1.14.0)
- JavaDriver (from 1.14.0)
- NativeDriver (from 1.14.0)
Read
Read the contents of a file with the read(...) function.
Example
var html = Fs.read('c:\\somedir\\somefile.html');
Support
- ChromeDriver (from 1.25)
- IEDriver (from 1.25)
- JavaDriver (from 1.25)
- NativeDriver (from 1.25)
Write
Writes arbitrary text to an arbitrary text file. If the file exists, it will be overwritten. If the file doesn’t exist, it will be created with the given contents. The contents are written using UTF-8 encoding without a byte order mark (BOM).
Throws appropriate exceptions if the write fails.
Example
Fs.write('c:\\somedir\\somefile.html', '<html><body><h1>Generated html!</h1></body></html>');
Support
- ChromeDriver (from 1.14.0)
- IEDriver (from 1.14.0)
- JavaDriver (from 1.14.0)
- NativeDriver (from 1.14.0)
Temp file
The tmpfile function will generate a random, non-conflicting filename in the temp folder.
Example
var tmpFilePath = Fs.tmpfile();
Support
- ChromeDriver (from 1.25)
- IEDriver (from 1.25)
- JavaDriver (from 1.25)
- NativeDriver (from 1.25)
App
The App variable contains functions relating to the app itself.
Location
Returns the current location (if applicable for the given application type – non-webapps do not support this).
Example
var loc = App.location();
Support
- ChromeDriver (from 0.13.0)
- IEDriver (from 0.13.0)
JavaDriverNativeDriver
Navigate
Navigates to the given url. If the url is relative (e.g. somefolder/somefile.html) it will get appended to the current url.
Parameters
urla string representing the destination for the navigation act
Example
// Absolute url
App.navigate("http://dr.dk");

// Relative url
App.navigate("news");
Support
- ChromeDriver (from 0.13.0)
- IEDriver (from 0.13.0)
JavaDriverNativeDriver
Session write
Store a value in the current session storage. This will be available across flows and for all applications.
Parameters
keya string denoting the key to store the value undervaluean object to storeoptionsan optional options object. Supported options are;expiresa timeout in minutes - after this interval has passed the value will be deleted. Default is 1440 min (= 1 day).
Example
// Storing a simple value - a string
App.session().write('mykey', 'myvalue');

// Storing an object - expires in 1 hour
App.session().write('myotherkey', { greeting: 'hello' }, { expires: 60 });
Support
- ChromeDriver (from 1.22)
- IEDriver (from 1.22)
- JavaDriver (from 1.22)
- NativeDriver (from 1.22)
Session read
Read a value stored in the current session.
Parameters
keya string denoting the key to retrieve the value for
Example
var v = App.session().read('mykey'); // e.g. will return 'myvalue'
Support
- ChromeDriver (from 0.13.0)
- IEDriver (from 0.13.0)
- JavaDriver (from 0.13.0)
- NativeDriver (from 0.13.0)
Session delete
Delete a value.
Parameters
keya string denoting the key to delete
Returns
The value deleted.
Example
var v = App.session().delete('mykey'); // e.g. will return 'myvalue'
Support
- ChromeDriver (from 0.13.0)
- IEDriver (from 0.13.0)
- JavaDriver (from 0.13.0)
- NativeDriver (from 0.13.0)
Quit
Quits the application - be aware that this is a hard shutdown and the user will not be prompted to save any information before the application exits.
Example
App.quit();
Support
- ChromeDriver (from 0.13.0)
- IEDriver (from 0.13.0)
- JavaDriver (from 0.13.0)
- NativeDriver (from 0.13.0)
Sticky
A sticky is a persistent window which can be configured to remain top-most as long as it’s shown. The user is able to interact with the items shown in the sticky e.g. clicking on links, opening pdf previews etc. Keyboard interaction is also supported, use:
| Key | Action |
|---|---|
↓ |
Focus next (down) item |
↑ |
Focus last (up) item |
.or - |
Toggle collapsed state of item |
<space> |
Run primary action (depends on the type of the item) |
<enter> |
Run secondary action |
<esc> |
Close sticky (or exit from search if search field is focused) |
| any char | Open search field |
Open
Open a new sticky window with the given name and opts. The function can be called multiple times with the same name argument in order to update an already showing sticky.
Parameters
namethe name of the window to open, only one sticky-window can have this nameoptsis an object containing the configuration for the sticky, it may have the following properties:embed(boolean, defaultfalse) should the sticky be embedded in the window of its owner application? When embed is set to true some of the below options are not relevantresizable(boolean, defaultfalse) should it be possible to resize the sticky windowmovable(boolean, defaultfalse) should it be possible to move the sticky windowsearchable(boolean, defaultfalse) should the contents of the sticky be searchableshowFooter(boolean, defaultfalse) should a foother with a nice logo be shownfontSize(int, default 12) the base font size to use for items in the stickyfocusOnUpdate(boolean, defaultfalse) when the sticky is updated should we focus the sticky window again?topMost(boolean, defaultfalse) should the sticky be top-most alwaystitlethe title of the sticky windowlocationdetermining where the sticky should be shown, contains:typewhich type of position - currently only ‘absolute’ is allowedtoppx from the top of the screenleftpx from the left side of the screenwidthpx width of stickyheightpx wheight of sticky
itemsa list of sticky items to show in the window, each is defined by:typewhich type of item - see below- more depending on the type, see below
Items
We support the following types of items.
GIF
The first is GIF which simply shows an (animated) gif - it may have the following properties:
sourcean url for a gif, can be remote or local
ACTION
An ACTION will run the flow with the name given when the sticky is clicked. For the ACTION type the following are valid.
namethe name of the action to launch - this should be uniqueheaderandbodyif set these will be shown instead of action name on stickyheightthe height of the item in pixelsinputsis an object containing the named inputs for the actionfocuswhether or not the item should have focus (only the first item with this property set to true will be focused)
Will show a pdf with an optional preview. The options are:
sourcean url (remote or local) to the pdf to showheaderandbodyif set these will be shown instead of the sourcelinkTextan optional text (or unicode icon) to show as a link to the source filelinkan optional link to direct the user to (default is value of source)heightthe height of the preview pane in pixelscollapsiblewhether or not the preview should be collapsible (defaultfalse)collapsedthe initial state of the preview (defaultfalse)saveablewhether or not it should be possible to save the pdf (defaulttrue)printablewhether or not it should be possible to print the pdf (defaulttrue)focuswhether or not the item should have focus (only the first item with this property set to true will be focused)
HTML
Will render a HTML snippet or a whole HTML page into an item. Should be used for render styled text, e.g. headers and such - not recommended for complete pages. Options are:
sourcehtml text or an url (remote or local) to the pdf to showheightthe height of the itemfocuswhether or not the item should have focus (only the first item with this property set to true will be focused)
LINK
Will act as a link (e.g. to an internet resource or a local file).
linkthe link to activate (when clicked)textoptional - the text to display (default is the url of the link)prefixoptional - the text to display before the link textsuffixoptional - the text to display after the link textfocuswhether or not the item should have focus (only the first item with this property set to true will be focused)
Example
Sticky.open(
  'mySticky',
  {
    embed: true,
    location: {
      type: 'absolute',
      top: 100,
      left: 100
    },
    items: [
      {
        type: 'GIF',
        source: 'http://gifs.com/cat'
      },
      {
        type: 'ACTION',
        name: 'SomeOtherAction',
        header: 'Some other action',
        body: 'Click to run'
      },
      {
        type: 'PDF',
        source: 'http://pdfworld.com/arandompdf.pdf',
        link: 'http://pdfworld.com/aboutarandompdf',
        height: 100,
        collapsible: true,
        collapsed: false,
        saveable: false,
        focus: true
      },
      {
        type: 'HTML',
        source: '<h1>Big header</h1><h2>Smaller header</h2>',
        height: 50
      },
      {
        type: 'LINK',
        link: 'http://sirenia.eu',
        prefix: 'Go to ', text: 'Sirenia', suffix: ' now'
      }
    ]
  }
);
Support
- ChromeDriver (from 1.16.0)
- IEDriver (from 1.16.0)
- JavaDriver (from 1.16.0)
- NativeDriver (from 1.16.0)
Model
Get the model used to construct the sticky,
Parameter
namethe name of the sticky to retrieve the model for (must be opened prior…)
Example
var m = Sticky.model('mySticky');
// Perhaps do some changes to model m and then
// Sticky.open('mySticky', m);
// to update the stikcy with the changes made to its model
Support
- ChromeDriver (from 1.25.0)
- IEDriver (from 1.25.0)
- JavaDriver (from 1.25.0)
- NativeDriver (from 1.25.0)
Close
Close a named sticky.
Parameter
namethe name of the sticky to close (must be opened prior…)
Example
Sticky.close('mySticky');
Support
- ChromeDriver (from 1.16.0)
- IEDriver (from 1.16.0)
- JavaDriver (from 1.16.0)
- NativeDriver (from 1.16.0)
Hide
Hide a named sticky.
Parameter
namethe name of the sticky to hide (must be opened prior…)
Example
Sticky.hide('mySticky');
Support
- ChromeDriver (from 1.16.0)
- IEDriver (from 1.16.0)
- JavaDriver (from 1.16.0)
- NativeDriver (from 1.16.0)
Show
Show a previously hidden sticky.
Parameter
namethe name of the sticky to show (must be hidden prior…)
Example
Sticky.show('mySticky');
Support
- ChromeDriver (from 1.16.0)
- IEDriver (from 1.16.0)
- JavaDriver (from 1.16.0)
- NativeDriver (from 1.16.0)
Timer
The timer module provides a simple interface for timing parts of flows. It is especially useful in combination with our Analytics product allowing you to time crucial parts of your flows.
Start
Start a named timer. If you invoke this method twice with the same name (argument) you’ll reset the timer every time.
Parameter
namethe name of the timer to start
Example
Timer.start('myTimer');
Support
- ChromeDriver (from 1.18.0)
- IEDriver (from 1.18.0)
- JavaDriver (from 1.18.0)
- NativeDriver (from 1.18.0)
Log
Log an event on a named timer. Useful only in combination with our Analytics product. The logged event will contain the name of the timer, the milliseconds since the timer was started and the given message.
Parameter
namethe name of the timer to log an event onmessagethe message to log
Returns
The number of milliseconds since the timer was started.
Example
Timer.log('myTimer', 'A message goes here');
Support
- ChromeDriver (from 1.18.0)
- IEDriver (from 1.18.0)
- JavaDriver (from 1.18.0)
- NativeDriver (from 1.18.0)
Stop
Stop a named timer.
Parameter
namethe name of the timer to stoplogwhether or not a message should be logged
Returns
The number of milliseconds since the timer was started.
Example
// Will log an event and stop 'myTimer'
Timer.stop('myTimer', true);
Support
- ChromeDriver (from 1.18.0)
- IEDriver (from 1.18.0)
- JavaDriver (from 1.18.0)
- NativeDriver (from 1.18.0)
Notifications
The notifications module makes it possible to display non-interactive notifications.
Show
Shows a notification.
Parameter
namethe name of the notification, save this for future update invocationsheaderthe header text to showbodythe body text to showoptionsis an object with the following additional options:severitythe severity of the notification, choose between “INFO”, “WARN” and “ERROR”. Default is “INFO”.timeoutseconds for the notification to show. Default is 30.callbacka javascript function to execute when the user clicks the notification. Default null.embeddefines whether the notification should be embedded in the current application or shown on the desktop (default isfalse= show on desktop)sounda string (one ofasterisk,beep,exclamation,hand,question) which indicates a system sound to play once the notification is shown.
Example
Show an INFO notification for 30 seconds.
Notification.show('hello', 'Seasonal greetings!', 'Felice navidad', {});
Show a WARN for 5 seconds.
Notification.show('warn', 'Its complicated', 'Something broke down', { severity: 'WARN', timeout: 5 });
Notifications with callbacks.
function RaiseTheAlarm() {
  Notification.show('Oh no!', 'You clicked the first notification', { severity: 'ERROR' });
}

// Callback to previously defined function
Notification.show('warn', 'Its complicated', 'Something broke down, click here', { severity: 'WARN', timeout: 5, callback: RaiseTheAlarm });

// Callback to anonymous function
Notification.show(
  'warn',
  'Its complicated',
  'Something broke down, click here',
  {
    severity: 'WARN',
    timeout: 5,
    callback: function() {
      Log.info('clicked', 'Notification was clicked');
    }
  });
Support
- ChromeDriver (from 1.22)
- IEDriver (from 1.22)
- JavaDriver (from 1.22)
- NativeDriver (from 1.22)
Update
Update the information in an already shown notification.
Parameter
namethe name of the notificationheaderthe header text to changebodythe body text to changeoptionsis same as for invoking show
Example
Update the notification named “hello”.
Notification.update('hello', 'Seasonal greetings anew!', 'Merry Christmas', {});
Support
- ChromeDriver (from 1.20)
- IEDriver (from 1.20)
- JavaDriver (from 1.20)
- NativeDriver (from 1.20)
Close
Close an open notification. Notifications will automatically be hidden but this can force that action.
Parameter
namethe name of the notification
Example
Close the notification named “hello”.
Notification.close('hello');
Support
- ChromeDriver (from 1.20)
- IEDriver (from 1.20)
- JavaDriver (from 1.20)
- NativeDriver (from 1.20)
Tasks
The Tasks module can be used to paralellize parts of a flow. This is useful for e.g. doing concurrent http requests or running background tasks. It is not intended for use with field-operations i.e. interacting with a host applications UI since this interaction cannot be parallelized. Furthermore you should not display dialogs in parallelized tasks as they can block the calling flow.
Run
Use the run method to start a new task.
Parameters
funa function to run in parallel
Returns
- a
Taskobject.
Example
Run some tasks and wait for the result.
var t = Task.run(
  function() {
    var i = 0;
    while (i<1000) {
      i = i + 1;
    }
    return i;
  });

// Wait for t to complete or 1000ms to elapse
if (t.wait(1000)) {
  // Access the result
  if (t.done && !t.failed) {
    Debug.showDialog("It completed with result="+t.result);
  } else (t.failed) {
    // only access t.error if t.failed == true
    Debug.showDialog("Took too long or errored? "+t.error !== null);
  }
} else {
  // 1 sec elapsed without the task completing
}
Run a task and execute a function when the task is done.
Task.run(...).then(function(result){
  // do something with the result of the task
});
Support
- ChromeDriver (from 1.22)
- IEDriver (from 1.22)
- JavaDriver (from 1.22)
- NativeDriver (from 1.22)
Wait for all tasks to complete
This is used to wait until all the tasks given as arguments complete or given milliseconds elapse.
Parameters
tasks- an [array of tasks or javascript functions] to run asynchronously (and then wait for)timeout[int] denoting the max number of milliseconds to wait for the tasks to complete
Returns
A [bool] indicating wether or not all tasks completed.
Example
var t = Task.run(function() { ... });
var tasks = [Task.run(function() { ... }), function() { ... }, t];

// Wait for tasks to complete or 1000ms to elapse
if (Task.waitAll(tasks, 1000)) {
  Debug.showDialog("It completed!");
} else {
  Debug.showDialog("Took too long");
}
Support
- ChromeDriver (from 1.22)
- IEDriver (from 1.22)
- JavaDriver (from 1.22)
- NativeDriver (from 1.22)
Wait for any tasks to complete
This is used to wait until one of the tasks given as arguments completes or given milliseconds elapse.
Parameters
tasks- an [array of tasks or javascript functions] to run asynchronously (and then wait for one of)timeout[int] denoting the max number of milliseconds to wait for any of the task to complete
Returns
An [int] denoting the index of the first task to complete or -1 if no tasks complete within given deadline.
Example
var t = Task.run(function() { ... });
var tasks = [Task.run(function() { ... }), function() { ... }, t];

// Wait for tasks to complete or 1000ms to elapse
var idx = Task.waitAny(tasks, 1000);
if(idx > 0) {
  Debug.showDialog("We have a winner: "+idx);
} else {
  Debug.showDialog("Took too long. Everybody lost.");
}
Support
- ChromeDriver (from 1.22)
- IEDriver (from 1.22)
- JavaDriver (from 1.22)
- NativeDriver (from 1.22)
JavaScript Task
A javascript representation of a .NET task. It has 2 methods; wait(milliseconds) which can be used to wait for the task to complete or the given milliseconds to elapse, whichever comes first and then(func) which can be used to run a function when the task completes.
For an example see the Run method on the Task module.
Guid
This very simple module provides utility functionality for dealing with globally unique identifiers - aka standardized random strings. Use these if you need to generate a unique file name or unique string in general.
Get
Returns a new random standard globally unique identifier
Example
var guid = Guid.get();
Support
- ChromeDriver (from 1.22)
- IEDriver (from 1.22)
- JavaDriver (from 1.22)
- NativeDriver (from 1.22)
Tables
The tables module provides functionality to read and write information stored on Kwanza and accessible from the configuration interface (Cuesta). It is meant to provide an easy way to add mapping or other types of tabular data to a flow. The UI for managing tables are shown below.
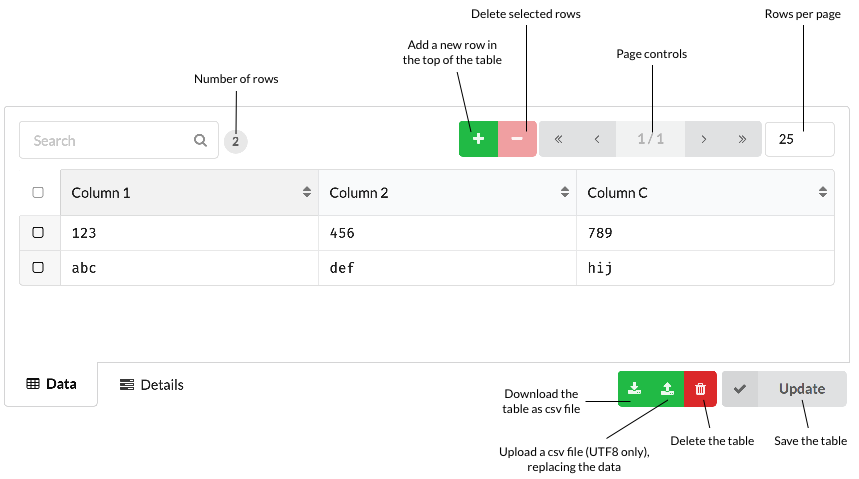
Note that only UTF8 formatted csv files are supported.
Navigation
Navigating the indvidual cells in the table can be done via the keyboard in a spreadsheet like manner. alt+<arrow-key> will move the focus depending on the arrow-key pressed. The video below shows an example of this (the keys pressed are shown in the bottom left corner of the video).
Inserting and removing rows
Inserting and deleting rows can also be done via the keyboard. Press ctrl+n to insert a row directly below the currently focused row.
Deleting a row is done via the ctrl+backspace key. It will remove the currently focused row.
Inserting and removing columns
This is done similarly to adding and removing rows but the cursor must be placed in the column header. ctrl+n adds a new column, while ctrl+backspace removes the current.
Shortcuts
| Key | Action |
|---|---|
alt+↓ |
Focus cell below |
alt+↑ |
Focus cell above |
alt→ |
Focus cell right |
alt+← |
Focus cell left |
ctrl+shift+a |
Insert new row/column |
ctrl+shift+backspace |
Remove row/column |
Read table as a map
The .map function will parse a table as a map, meaning that it will use a given column as an index. This is mainly useful if there is a column with unique values to use for the index. The returned structure will be a map with the column headers as keys.
Example
Given the table named foo:
| A | B |
|---|---|
| idx1 | val1 |
| idx2 | val2 |
And the code:
var m = Table.map('foo', 'A');
You’ll get the following object back:
{
  'idx1': { 'A': 'idx1', 'B': 'val1' },
  'idx2': { 'A': 'idx2', 'B': 'val2' }
}
Which can then be used in the following manner:
var idx2val = m['idx2']['B'];
// or if the column names are valid javascript identifiers
var idx1val = m.idx1.B;
Parameters
name- [string] the name of the table to create a map fromindex- [string] the name of the column to use as an index
Support
- ChromeDriver (from 1.23)
- IEDriver (from 1.23)
- JavaDriver (from 1.23)
- NativeDriver (from 1.23)
Read table as list of rows
The .rows function will return the raw table as a javascript array of arrays.
Example
Given the table named foo identical to the table from .map and the code:
var m = Table.rows('foo');
You’ll get the following object back:
{
  rows: [
    ['idx1', 'val1'],
    ['idx2', 'val2'],
  ]
}
Which can then be used in the following manner:
var idx2val = m.rows[1][1];
Parameters
name- [string] the name of the table to create from
Support
- ChromeDriver (from 1.23)
- IEDriver (from 1.23)
- JavaDriver (from 1.23)
- NativeDriver (from 1.23)
Update the contents of a table
The object returned from both .map and .rows contains a .save function which can be used to write data back to a table.
Examples
Update existing entries
Given the table from the previous examples and the code:
var m = Table.rows('foo');
m.rows[0][1] = 'newval1';
m.save();
Will change the value of the specified cell and update the table. This also works if .map is used:
var m = Table.map('foo', 'A');
m.idx1.A = 'newval1';
m.save();
Add new entries
Adding to a table read by the rows approach:
var m = Table.rows('foo');
m.rows.push(['idx3', 'val3']);
m.save();
This will add a new row with idx3 and val3. When using rows the order of the input elements matter and should match the order of the columns.
The same information can be added when the table is read via the map approach as follows:
var m = Table.map('foo', 'A');
m.rows['idx3'] = { 'A': 'idx3', 'B': 'val3'};
m.save();
Remove entries
Removing a row from a table read by the rows approach is done by removing the corresponding array entry:
var rowToDelete = 0;
var foo = Table.rows("foo");
foo.rows.splice(rowToDelete, 1); // Delete the row w index 0
foo.save();
and the equivalent delete of a entry from a map table:
foo = Table.map('foo', 'A');
delete foo["idx1"]; // Delete the entry with key 'idx1'
foo.save();
Support
- ChromeDriver (from 1.23)
- IEDriver (from 1.23)
- JavaDriver (from 1.23)
- NativeDriver (from 1.23)
Use the contents of a Table as options for a typeahead
This is achieved by calling the selectFrom method on the structure created by the .map function. The selectFrom function takes either a format string or an object with options to generate the content for a typeahead.
var m = Table.map(...);
m.selectFrom('{{someColumn}} some text {{someOtherColumn}}');
Using a format string (above) and an object with options (below).
var m = Table.map(...);
m.selectFrom({
  format: '{{someColumn}} some text {{someOtherColumn}}',
  minInputLength: 3,
  filterMode: 'contains'
});
Env
The env module provides some contextual information for flows.
Username
Get the username for the current user.
Example
var u = Env.userName;
Support
- ChromeDriver (from 1.24)
- IEDriver (from 1.24)
- JavaDriver (from 1.24)
- NativeDriver (from 1.24)
Name of machine
Get the name of the machine.
Example
var m = Env.machineName;
Support
- ChromeDriver (from 1.24)
- IEDriver (from 1.24)
- JavaDriver (from 1.24)
- NativeDriver (from 1.24)
Domain
Get the domain for the current user.
Example
var u = Env.userDomain;
Support
- ChromeDriver (from 1.24)
- IEDriver (from 1.24)
- JavaDriver (from 1.24)
- NativeDriver (from 1.24)
Primary screen
Get information about the primary screen of the local machine.
Example
var s = Env.primaryScreen;
s will now be an object like so:
// s
{
  width: 1024,
  height: 768,
  primary: true
}
Support
- ChromeDriver (from 1.25)
- IEDriver (from 1.25)
- JavaDriver (from 1.25)
- NativeDriver (from 1.25)
Screens
Get information about all the screens attached to the local machine.
Example
var screens = Env.screens;
screens will now be an array of screen objects, like so:
// screens
[
  {
    width: 1024,
    height: 768,
    primary: true
  },{
    width: 1280,
    height: 1024,
    primary: false
  }
]
Support
- ChromeDriver (from 1.25)
- IEDriver (from 1.25)
- JavaDriver (from 1.25)
- NativeDriver (from 1.25)